
Revolutionizing the Dining Experience: Building a User-Friendly Restaurant App with ChatGPT
In today’s fast-paced world, where convenience meets technology at every corner, the dining experience is no exception. Restaurants are increasingly turning to digital solutions to enhance customer engagement, streamline operations, and expand their reach. One of the most powerful tools in this digital transformation is the restaurant app, and with the integration of AI technologies like ChatGPT, these apps are not just functional—they’re revolutionary.
The Power of a Restaurant App
A restaurant app can transform the way customers interact with your business. From browsing menus and placing orders to making reservations and accessing loyalty programs, an app offers a one-stop solution that catifies both convenience and enhanced dining experiences. For restaurant owners, it provides invaluable data on customer preferences, peak times, and popular dishes, which can be leveraged to optimize both menu offerings and staffing decisions.
Why Integrate AI with ChatGPT?
Integrating AI, particularly a conversational model like ChatGPT, can take your restaurant app to the next level. ChatGPT can handle inquiries, take orders, resolve common issues, and provide personalized recommendations, all through conversational interactions that mimic human engagement. This not only improves the user experience by making app interactions more natural and efficient but also frees up human staff to focus on the in-person customer service aspects that are so vital to the hospitality industry.
Key Features to Consider
When planning your restaurant app, consider the following features to enhance functionality and user satisfaction:
- Menu Exploration and Ordering: Allow customers to browse digital menus, customize orders, and even schedule orders in advance.
- Table Reservations: Enable a seamless reservation system with real-time availability updates.
- Loyalty Programs: Incorporate a loyalty or rewards program that integrates seamlessly with the app, encouraging repeat business.
- Customer Feedback: Include a feature for customers to easily provide feedback, which is crucial for continual improvement.
- AI-Driven Personalization: Use AI to analyze customer preferences and behavior to offer personalized recommendations and promotions.
Building the App: Step by Step
- Conceptualization: Start with a clear idea of what you want your app to achieve. Consider your target audience, what features they would value, and what makes your restaurant unique.
- Design and User Experience (UX): Focus on creating an intuitive and attractive design. The user interface should be clean, and the user experience should be smooth. Remember, a well-designed app encourages longer engagement.
- Development: Choose the right technology stack and development approach. Developing a native app for iOS and Android may be beneficial due to better performance and broader functionality.
- Integration of AI with ChatGPT: Partner with AI specialists or use platforms that allow for the integration of AI services like ChatGPT to handle communications, orders, and customer service.
- Testing and Launch: Thoroughly test the app for bugs and ensure it delivers a strong user experience across different devices. After testing, plan a launch that includes marketing strategies to get your app into the hands of your diners.
- Feedback and Iteration: Once your app is live, gather user feedback and use it to refine and improve the app. Regular updates are crucial to keeping the app relevant and functioning optimally.
// Welcome to the Build Process of Our iOS Restaurant Menu App!
//
// In this video, we'll take you through the journey of creating an iOS application using Swift and UIKit.
// This application serves as a digital menu for a restaurant, displaying various food items with descriptions,
// prices, and images to enhance user experience.
//
// Key Features Demonstrated in This Video:
// 1. **Custom Table View Cells**: Learn how to create and style UITableView cells that display food item details.
// 2. **Data Handling**: We'll manage a list of food items using a structured data model and populate UI components.
// 3. **Dynamic Content**: See how to dynamically configure cells based on the food item data.
// 4. **Navigation and Layout**: Explore the use of UINavigationController for navigating between screens and
// see how Auto Layout is used to create responsive and adaptive UIs.
// 5. **Interactive Elements**: Implementation of interactive elements like buttons which will allow users
// to perform actions such as ordering a food item.
//
// We hope this video will be informative and helpful as you learn more about iOS development with Swift.
// Let's get started and dive into the code!
import UIKit
// Here, we start by defining the basic structure of our application, setting up the initial view controllers,
// and preparing for the addition of major components like the table view and detail view.
// Please follow along as we build and run each part of the app.
// Defines a structure named `FoodItem` to represent individual items in a restaurant's menu.
struct FoodItem {
// `name`: A string variable that holds the name of the food item.
// It is essential for identifying the item on the menu and is displayed in the user interface.
var name: String
// `description`: A string variable that provides a detailed description of the food item.
// This could include ingredients, preparation style, or other relevant information that helps
// customers make an informed choice about what they are ordering.
var description: String
// `price`: A Double type variable that represents the cost of the food item.
// It is used in the menu to show how much the item will cost the customer. The use of Double
// ensures that the price can include cents, accommodating a precise cost representation.
var price: Double
// `category`: A string variable that categorizes the food item within the menu.
// Examples of categories include "Dessert", "Main Course", "Appetizers", etc.
// This helps in organizing the menu and allows for easier navigation through sections
// in a user interface, especially in larger menus.
var category: String
// `imageName`: A string variable intended to store the name of a local image file associated with the food item.
// This image name is used to load and display an image representing the food item visually in the user interface.
// It is critical for enhancing the user's browsing experience, allowing them to visually identify what
// they might be ordering. The comment "Added imageName to store the local image name" explicitly states the purpose.
var imageName: String
}
import UIKit
// MenuViewController manages the display of food items in a table view within a restaurant app.
class MenuViewController: UIViewController, UITableViewDelegate, UITableViewDataSource {
// Declare a UITableView instance which will display the list of food items.
var tableView: UITableView!
// Declare an UIImageView instance for showcasing a prominent restaurant image at the top of the view.
let restaurantImageView = UIImageView()
// Declare an array of FoodItem structures to store the different food items available in the restaurant.
var foodItems: [FoodItem] = []
// Called after the controller's view is loaded into memory.
override func viewDidLoad() {
super.viewDidLoad()
setupRestaurantImage() // Setup the main image of the restaurant.
setupTableView() // Setup the tableView properties and layout.
populateFoodItems() // Populate the tableView with food items.
}
// Populates the foodItems array with a list of food items.
func populateFoodItems() {
foodItems = [
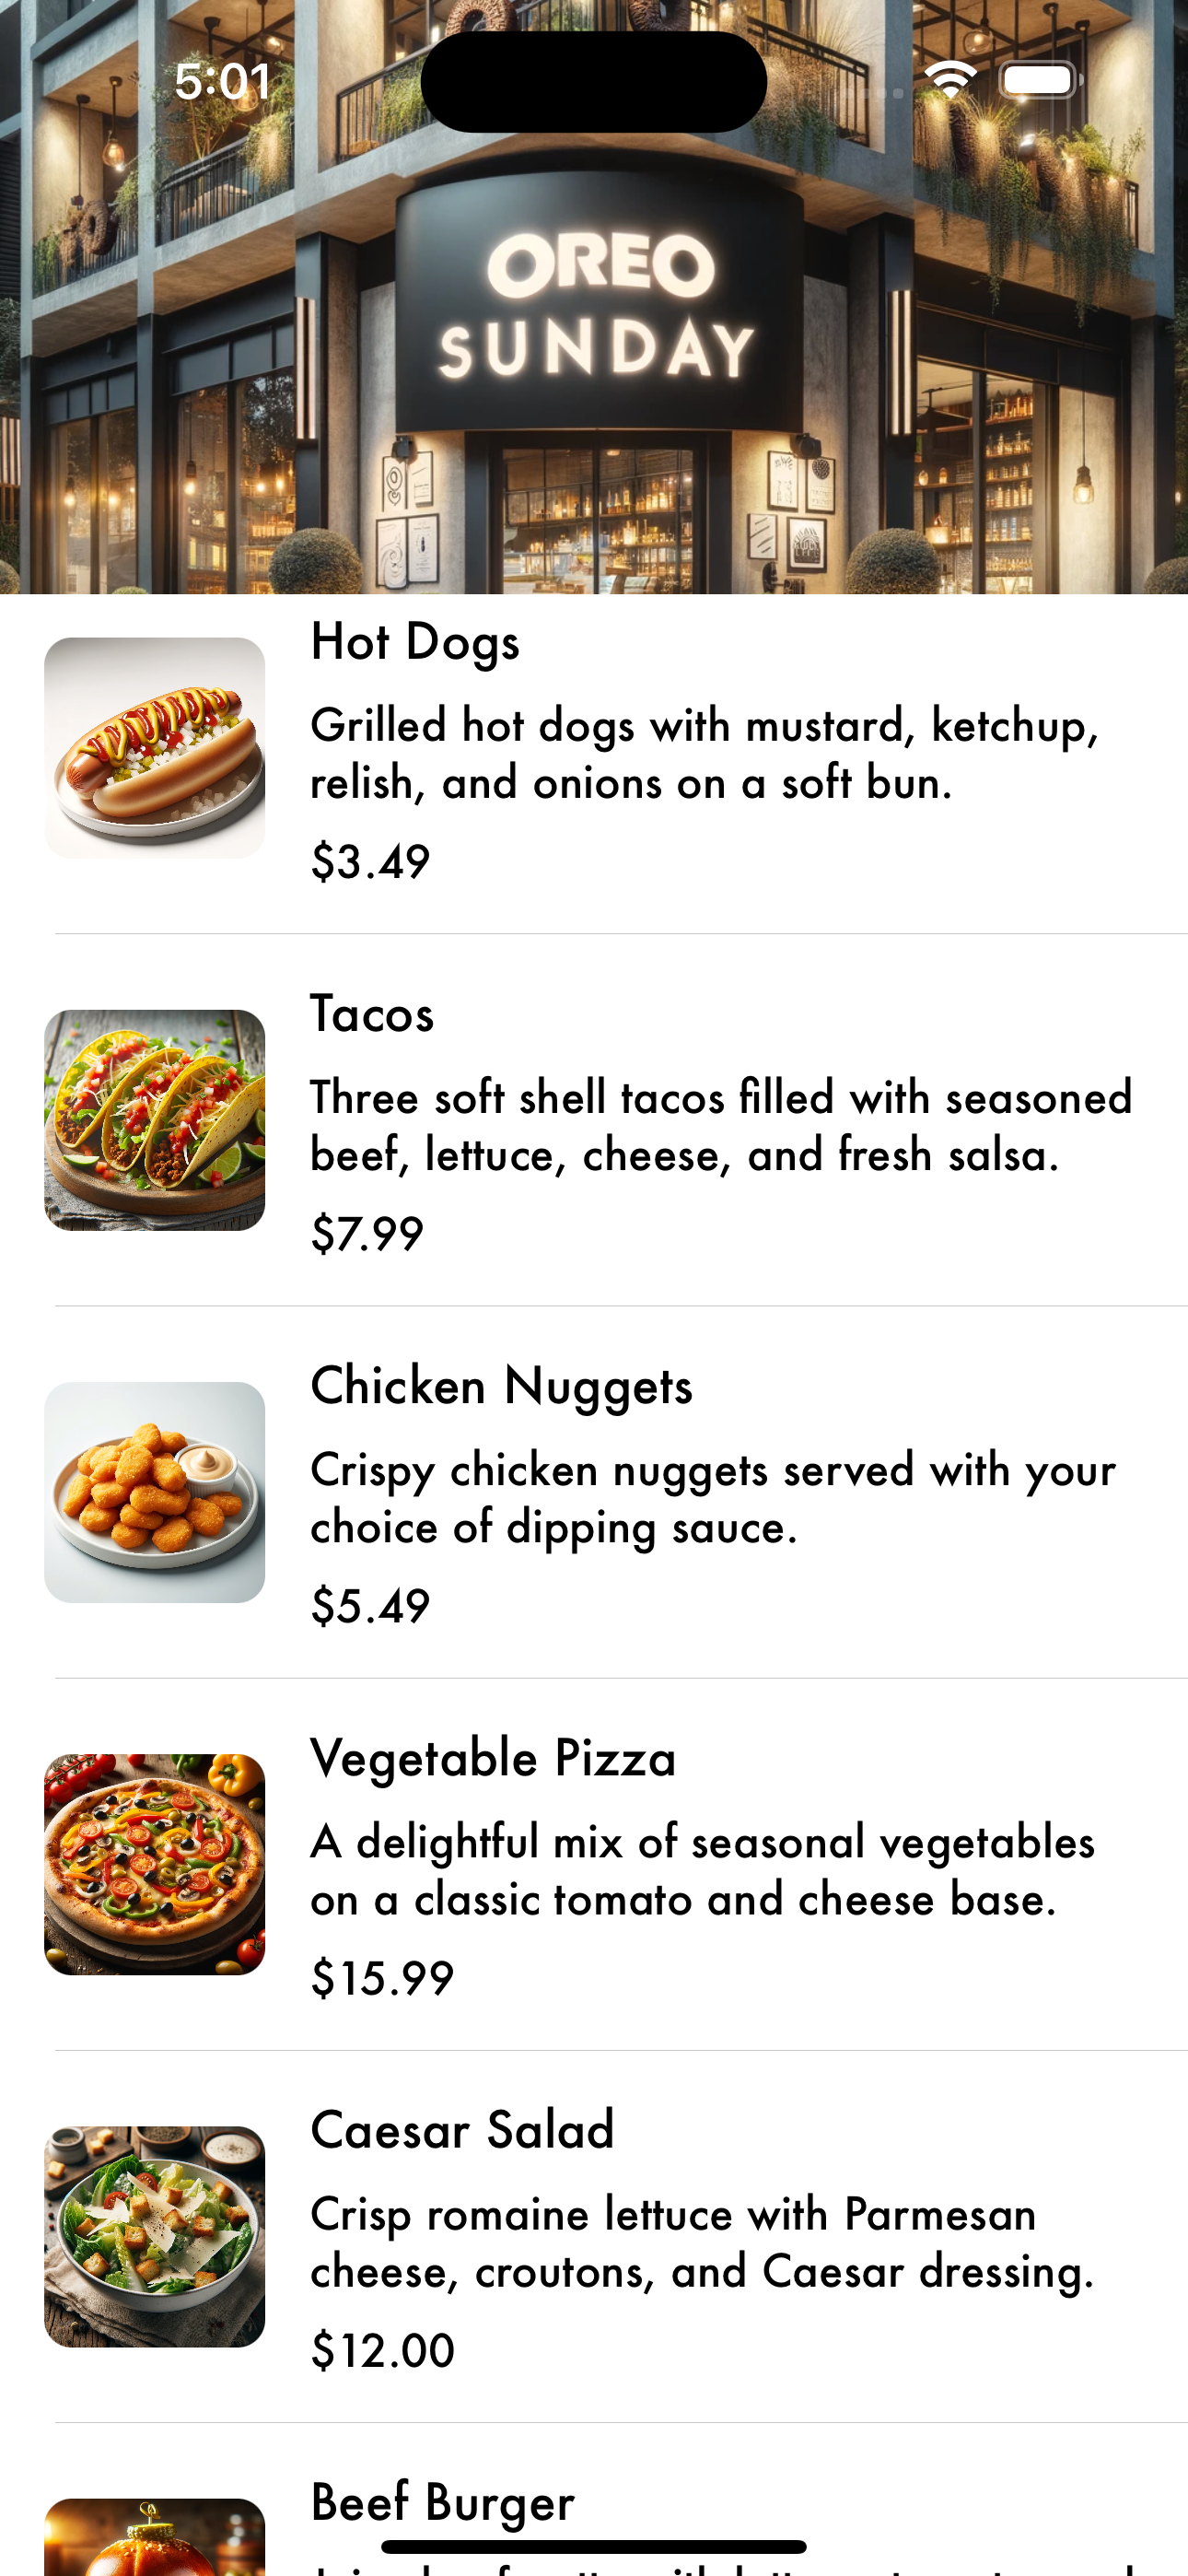
FoodItem(name: "Oreo Sundae", description: "Classic vanilla ice cream topped with crushed Oreos, chocolate syrup, and a sprinkle of magic.", price: 100, category: "Dessert", imageName: "oreoSunday"),
FoodItem(name: "Regular Sundae", description: "Classic vanilla ice cream topped with rich chocolate syrup and a cherry.", price: 50, category: "Dessert", imageName: "sundae"),
FoodItem(name: "Hot Dogs", description: "Grilled hot dogs with mustard, ketchup, relish, and onions on a soft bun.", price: 3.49, category: "Main Course", imageName: "HotDog"),
FoodItem(name: "Tacos", description: "Three soft shell tacos filled with seasoned beef, lettuce, cheese, and fresh salsa.", price: 7.99, category: "Main Course", imageName: "Tacos"),
FoodItem(name: "Chicken Nuggets", description: "Crispy chicken nuggets served with your choice of dipping sauce.", price: 5.49, category: "Main Course", imageName: "ChickenNuggets"),
// Additional food items added below
FoodItem(name: "Vegetable Pizza", description: "A delightful mix of seasonal vegetables on a classic tomato and cheese base.", price: 15.99, category: "Main Course", imageName: "pizza"),
FoodItem(name: "Caesar Salad", description: "Crisp romaine lettuce with Parmesan cheese, croutons, and Caesar dressing.", price: 12.00, category: "Salad", imageName: "salad"),
FoodItem(name: "Beef Burger", description: "Juicy beef patty with lettuce, tomato, and secret sauce.", price: 9.99, category: "Main Course", imageName: "burger"),
FoodItem(name: "Mango Smoothie", description: "Fresh mango blended with ice and a hint of honey.", price: 6.50, category: "Beverages", imageName: "smoothie")
]
}
// Sets up the restaurant's main image.
func setupRestaurantImage() {
restaurantImageView.image = UIImage(named: "storeFrontImage")
restaurantImageView.contentMode = .scaleAspectFill
restaurantImageView.clipsToBounds = true
view.addSubview(restaurantImageView)
}
// Sets up and configures the tableView.
func setupTableView() {
tableView = UITableView()
tableView.delegate = self // Set self as delegate to handle row selection.
tableView.dataSource = self // Set self as data source to provide cells, rows, etc.
tableView.register(FoodItemCell.self, forCellReuseIdentifier: "FoodItemCell") // Register the custom cell.
tableView.rowHeight = UITableView.automaticDimension // Automatic row height calculation.
tableView.estimatedRowHeight = 120 // Provide an estimated height for better performance.
view.addSubview(tableView)
}
// Called to re-layout subviews, adjusting frames of the restaurant image and tableView.
override func viewDidLayoutSubviews() {
super.viewDidLayoutSubviews()
restaurantImageView.frame = CGRect(x: 0, y: 0, width: view.frame.size.width, height: view.frame.size.width * 0.5)
tableView.frame = CGRect(x: 0, y: restaurantImageView.frame.maxY, width: view.frame.size.width, height: view.frame.size.height - restaurantImageView.frame.height)
}
// UITableViewDataSource method to determine the number of rows in the tableView.
func tableView(_ tableView: UITableView, numberOfRowsInSection section: Int) -> Int {
return foodItems.count
}
// UITableViewDataSource method to configure and return a cell for a given indexPath.
func tableView(_ tableView: UITableView, cellForRowAt indexPath: IndexPath) -> UITableViewCell {
guard let cell = tableView.dequeueReusableCell(withIdentifier: "FoodItemCell", for: indexPath) as? FoodItemCell else {
return UITableViewCell()
}
let item = foodItems[indexPath.row]
cell.configure(with: item.name, description: item.description, price: item.price, imageName: item.imageName)
return cell
}
// UITableViewDelegate method to handle actions when a row is selected.
func tableView(_ tableView: UITableView, didSelectRowAt indexPath: IndexPath) {
let foodItem = foodItems[indexPath.row]
let detailVC = DetailViewController(foodItem: foodItem) // Using dependency injection
navigationController?.pushViewController(detailVC, animated: true)
}
}
import UIKit
class FoodItemCell: UITableViewCell {
var itemImageView = UIImageView()
var titleLabel = UILabel()
var descriptionLabel = UILabel()
var priceLabel = UILabel()
override init(style: UITableViewCell.CellStyle, reuseIdentifier: String?) {
super.init(style: style, reuseIdentifier: reuseIdentifier)
contentView.addSubview(itemImageView)
contentView.addSubview(titleLabel)
contentView.addSubview(descriptionLabel)
contentView.addSubview(priceLabel)
applyConstraints()
titleLabel.numberOfLines = 0 // Allows label to grow based on content
descriptionLabel.numberOfLines = 0
itemImageView.layer.cornerRadius = 10
itemImageView.clipsToBounds = true
}
required init?(coder: NSCoder) {
fatalError("init(coder:) has not been implemented")
}
private func applyConstraints() {
itemImageView.translatesAutoresizingMaskIntoConstraints = false
titleLabel.translatesAutoresizingMaskIntoConstraints = false
descriptionLabel.translatesAutoresizingMaskIntoConstraints = false
priceLabel.translatesAutoresizingMaskIntoConstraints = false
NSLayoutConstraint.activate([
itemImageView.leadingAnchor.constraint(equalTo: contentView.leadingAnchor, constant: 16),
itemImageView.centerYAnchor.constraint(equalTo: contentView.centerYAnchor),
itemImageView.widthAnchor.constraint(equalToConstant: 80), // Increased size
itemImageView.heightAnchor.constraint(equalToConstant: 80), // Increased size
titleLabel.topAnchor.constraint(equalTo: contentView.topAnchor, constant: 16),
titleLabel.leadingAnchor.constraint(equalTo: itemImageView.trailingAnchor, constant: 16),
titleLabel.trailingAnchor.constraint(equalTo: contentView.trailingAnchor, constant: -16),
descriptionLabel.topAnchor.constraint(equalTo: titleLabel.bottomAnchor, constant: 8),
descriptionLabel.leadingAnchor.constraint(equalTo: titleLabel.leadingAnchor),
descriptionLabel.trailingAnchor.constraint(equalTo: titleLabel.trailingAnchor),
priceLabel.topAnchor.constraint(equalTo: descriptionLabel.bottomAnchor, constant: 8),
priceLabel.leadingAnchor.constraint(equalTo: titleLabel.leadingAnchor),
priceLabel.bottomAnchor.constraint(equalTo: contentView.bottomAnchor, constant: -16) // Added bottom constraint for better vertical spacing
])
}
func configure(with name: String, description: String, price: Double, imageName: String) {
titleLabel.font = UIFont(name: "Futura", size: 18)
descriptionLabel.font = UIFont(name: "Futura", size: 16)
priceLabel.font = UIFont(name: "Futura", size: 16)
titleLabel.text = name
descriptionLabel.text = description
priceLabel.text = String(format: "$%.2f", price)
itemImageView.image = UIImage(named: imageName) // Configure the image view with the local image
}
}
import UIKit
class DetailViewController: UIViewController {
var foodItem: FoodItem? // The food item to display
private let scrollView = UIScrollView()
private let contentView = UIView()
private let imageView = UIImageView()
private let titleLabel = UILabel()
private let descriptionLabel = UILabel()
private let priceLabel = UILabel()
private let orderButton = UIButton() // Add order button
init(foodItem: FoodItem) {
self.foodItem = foodItem
super.init(nibName: nil, bundle: nil)
}
required init?(coder: NSCoder) {
fatalError("init(coder:) has not been implemented")
}
override func viewDidLoad() {
super.viewDidLoad()
view.backgroundColor = .white
setupScrollView()
setupViews()
configureViews()
}
private func setupViews() {
// Image View
imageView.contentMode = .scaleAspectFill
imageView.clipsToBounds = true
contentView.addSubview(imageView)
// Title Label
titleLabel.font = UIFont(name: "Futura", size: 24)
contentView.addSubview(titleLabel)
// Description Label
descriptionLabel.font = UIFont(name: "Futura", size: 18)
descriptionLabel.numberOfLines = 0
contentView.addSubview(descriptionLabel)
// Price Label
priceLabel.font = UIFont(name: "Futura", size: 20)
contentView.addSubview(priceLabel)
// Order Button
orderButton.setTitle("Order", for: .normal)
orderButton.backgroundColor = .red
orderButton.setTitleColor(.white, for: .normal)
orderButton.layer.cornerRadius = 10
orderButton.addTarget(self, action: #selector(orderButtonTapped), for: .touchUpInside)
contentView.addSubview(orderButton)
orderButton.isUserInteractionEnabled = true
orderButton.isEnabled = true
// Apply Auto Layout
imageView.translatesAutoresizingMaskIntoConstraints = false
titleLabel.translatesAutoresizingMaskIntoConstraints = false
descriptionLabel.translatesAutoresizingMaskIntoConstraints = false
priceLabel.translatesAutoresizingMaskIntoConstraints = false
orderButton.translatesAutoresizingMaskIntoConstraints = false
NSLayoutConstraint.activate([
imageView.topAnchor.constraint(equalTo: contentView.topAnchor),
imageView.leadingAnchor.constraint(equalTo: contentView.leadingAnchor),
imageView.trailingAnchor.constraint(equalTo: contentView.trailingAnchor),
imageView.heightAnchor.constraint(equalTo: contentView.widthAnchor),
titleLabel.topAnchor.constraint(equalTo: imageView.bottomAnchor, constant: 20),
titleLabel.leadingAnchor.constraint(equalTo: contentView.leadingAnchor, constant: 20),
titleLabel.trailingAnchor.constraint(equalTo: contentView.trailingAnchor, constant: -20),
descriptionLabel.topAnchor.constraint(equalTo: titleLabel.bottomAnchor, constant: 10),
descriptionLabel.leadingAnchor.constraint(equalTo: titleLabel.leadingAnchor),
descriptionLabel.trailingAnchor.constraint(equalTo: titleLabel.trailingAnchor),
priceLabel.topAnchor.constraint(equalTo: descriptionLabel.bottomAnchor, constant: 10),
priceLabel.leadingAnchor.constraint(equalTo: titleLabel.leadingAnchor),
priceLabel.bottomAnchor.constraint(equalTo: orderButton.topAnchor, constant: -20),
orderButton.bottomAnchor.constraint(equalTo: contentView.bottomAnchor, constant: -20),
orderButton.leadingAnchor.constraint(equalTo: contentView.leadingAnchor, constant: 20),
orderButton.trailingAnchor.constraint(equalTo: contentView.trailingAnchor, constant: -20),
orderButton.heightAnchor.constraint(equalToConstant: 50)
])
}
func configureViews() {
guard let foodItem = foodItem else { return }
imageView.image = UIImage(named: foodItem.imageName)
titleLabel.text = foodItem.name
descriptionLabel.text = foodItem.description
priceLabel.text = String(format: "$%.2f", foodItem.price)
}
@objc private func orderButtonTapped() {
print("Order button was tapped")
let alert = UIAlertController(title: "Order Confirmation", message: "Your Order is on its way!", preferredStyle: .alert)
let okAction = UIAlertAction(title: "OK", style: .default, handler: nil)
alert.addAction(okAction)
present(alert, animated: true, completion: nil)
}
private func setupScrollView() {
view.addSubview(scrollView)
scrollView.addSubview(contentView)
scrollView.translatesAutoresizingMaskIntoConstraints = false
contentView.translatesAutoresizingMaskIntoConstraints = false
NSLayoutConstraint.activate([
scrollView.topAnchor.constraint(equalTo: view.topAnchor),
scrollView.leadingAnchor.constraint(equalTo: view.leadingAnchor),
scrollView.trailingAnchor.constraint(equalTo: view.trailingAnchor),
scrollView.bottomAnchor.constraint(equalTo: view.bottomAnchor),
contentView.topAnchor.constraint(equalTo: scrollView.topAnchor),
contentView.leadingAnchor.constraint(equalTo: scrollView.leadingAnchor),
contentView.trailingAnchor.constraint(equalTo: scrollView.trailingAnchor),
contentView.bottomAnchor.constraint(equalTo: scrollView.bottomAnchor),
contentView.widthAnchor.constraint(equalTo: scrollView.widthAnchor)
])
}
}
Conclusion
Developing a restaurant app equipped with AI like ChatGPT can significantly enhance the dining experience by making it more interactive, personalized, and convenient. Such technology not only sets your restaurant apart from the competition but also directly contributes to higher customer satisfaction and increased profitability. As we look to the future of dining, embracing these technologies is not just an option; it’s essential to staying relevant in an increasingly digital world.
Subscribe and stay tuned for more insights into creating powerful apps with AI, and revolutionize your restaurant’s digital presence. 🚀📲✨
